An Apple a Day (BB16)

9May 2013-1159

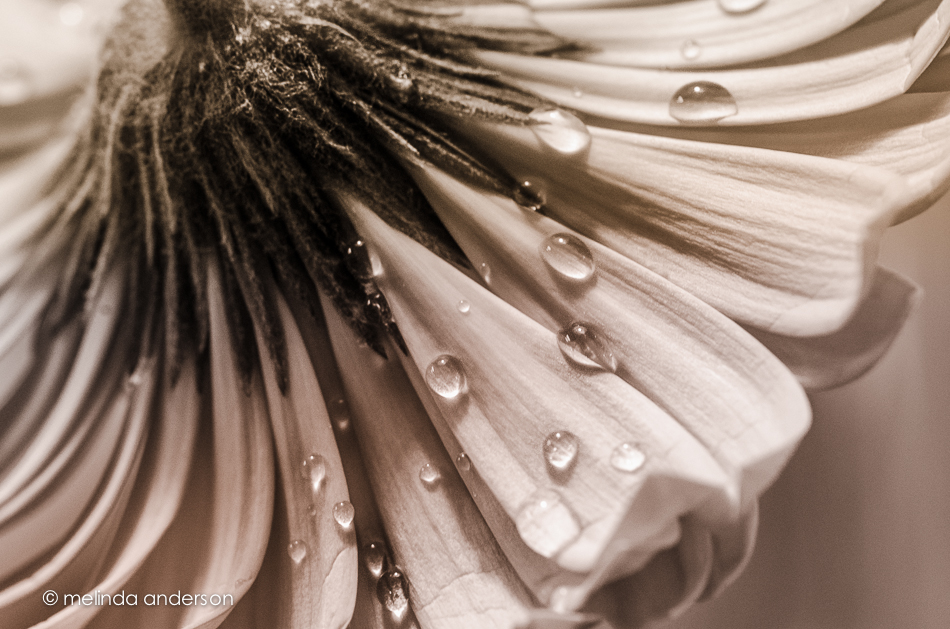
Our assignment this time is to shoot as many apple photos as we can over the next week. Of course I started with a macro- taken with the camera on a tripod and using a long exposure, no special processing.

Expect to see a few more apple photos over the next week!


Beyond Beyond 15

The theme for this week’s lesson was I Collect. Kim Klassen showed some of her collections of photos, books, and memorabilia dropped artfully on the floor. I chose to instead quickly drag out some of my family memorabilia that I have acquired over the years and arrange them on top of the old dental cabinet where they normally reside inside drawers.  During the two years that I did a Project 365, almost every item pictured here was featured on my blog.  I am an avid family genealogist and lover of all things antique and am now, in my later years, trying to figure out what I really want to keep (everything in this photo, for sure).

1May2013-1074-Edit-2

The other part of the lesson was to ponder our STYLE in photography. I’ve seen this topic bandied about on the Clickin Moms forum; I think it is probably more of a big deal when you are a pro. For me, I know I like bright colors AND black and white photography AND strong compositional elements.  I rarely like haze and matte processing in my own images, except in some of my lighter floral photos- but I like it in the work of others.  I love landscapes- but don’t feel particularly competent in achieving the look I admire in the work of other photographers.  I’m not too worried about finding my style, but hope it is evolving as I learn.

Photo processing notes: Although I didn’t do anything special photographing the little scene above (tripod, door open for light), I did try something new in processing after doing my basic edit. I used a free “hand-tinting” preset from OnOne software (I have their Perfect Effects 4). What it did was convert the photo to black and white, but bring back anything that was colored brown (by desaturating blues, greens, etc). I chose this preset, because I didn’t like the blue color of the writing on the Hopalong Cassidy mug in the cabinet amid the brown tones of the image. So basically, almost everything was left in the brown tones except the mug-  easier than using an adjustment brush.  In Photoshop, I stretched the canvas as we learned in a previous lesson and added a texture to just the bottom section.

Beyond Beyond 14

Our lesson this week had so many great tips and tricks! We learned animated GIFs which I had tried once before, selection tools in Photoshop (including one that makes me want to upgrade to CS6), working with curves in Lightroom, and extending the background on a vertical photo so that it fits better on your blog.

SanDiegoMar2013-8240-Edit-Edit

As you can see, I really took that last lesson to heart.  Here is a vertical image, nicely extended into a somewhat horizontal one, which fits so much more nicely on this page.  What you probably can’t see is that I played with the Lightroom curves tool, adding haze and lightening some of the colors, AND I took it into Perfect Effects 4 and added a sky with clouds (with much reduced opacity so that it blended in with the original sky)!  Although I haven’t made a new animated gif, I feel like I got my homework DONE!

By the way, this photo is from our trip to San Diego in March.

Beyond Beyond 13

It was all about SKY in this lesson- replacing sky, to be exact. 

17Apr2013-0665-Edit

There was not a cloud in the sky yesterday when I walked over to the open space in my neighborhood to take this photo.  I took a few shots, mindful that I was going to have to use the Quick Selection tool in Photoshop when I edited this photo.  Selection tools and cloning and healing brushes were the hardest things for me when I first started photo editing.  I have become fairly proficient with cloning and healing, but tend to avoid the selection tools most of the time.  I like brushing best- so often use Quick Mask, which I learned in Damien Symonds’ class, instead of the other selection tools.  

For this assignment, I downloaded some skies, following Kim’s link, forgetting that I have a couple available in Perfect Effects, and was pretty successful with my Quick Selection tool.  I ended up converting it to a black and white, possibly because I had just watched a Moose Peterson series of videos on Kelby Training on black and white photography.

Replacing skies will probably not be big in my arsenal of Photoshop tricks, although it is great to know how to do it- and I need more practice.  I felt like I had crossed some sort of line with this assignment.  When I saw Scott Kelby last year, he said his rule for himself was he felt comfortable removing items from a photo (telephone wires, tourists, etc.), but not adding things.  He had replaced a sky once, but never felt right about it.  But in Moose Peterson’s video that I watched yesterday, he casually remarked that he sometimes combines waves from three photos when photographing the ocean.  And I read on Damien Symonds’ Facebook page last night that he has been known to clone eyelashes (!) from one eye to another to fix an out-of-focus eye when he is retouching photos. Wow!

I do love Photoshop!


Beyond Beyond 12

Tint and/or type was the challenge this week- and I went with tint, specifically using the graduated filter in Lightroom to create tint presets for black and whites.

I’ve been doing a lot of macro lately; here is my original image edited in color.

9Apr2013-0405

I made a virtual copy, which I converted to black and white.  Then I added a very slight lavender tint to a couple graduated filters which I positioned on angles in the image.

9Apr2013-0405-3

And here is my third version- a black and white conversion with yellow and lavender tinted graduated filters.  Looks like sepia. . .

9Apr2013-0405-2


Beyond Beyond 11

We had a really fun lesson today that would have been so useful in my teaching and scrapbooking days.  Maybe I’ll be inspired to get back into digital scrapbooking or at least more card-making.  The lesson had to do with finding a bunch of objects in one color, taking a photo, and then making a layout using color swatches from the photo. Really, really fun!  There was also a lesson on creating presets of color hazes, which I actually already know how to do, thank goodness.  I used one of my haze presets for the first photo.

Because I was waiting for my houseguests (Debbie and Dale!!!) to arrive, I wanted to get my homework done quickly.  I actually skipped the first step of taking a photo and found two photos to use that had lots of shades in the same color family.

This is from our visit to Balboa Park in San Diego; I almost stopped traffic to get this photograph!

SanDiegoMar2013-8298-Edit

And this one is from our own backyard (last week).

28Mar2013-0257-Edit-2

I realize now that I shouldn’t have used a white background for the layouts- stretching the image to make the space at the bottom was half the fun for me!  I also figured out where to find square brushes- I don’t use many brushes in Photoshop.  As I said, a fun lesson!

Beyond Beyond 10

28Mar2013-0231-Edit

The words on this image became my mantra today as I worked on Lesson 10 in Beyond Beyond.  It was a short lesson, with a Lightroom preset, a texture, and a new video on adding text (this time to a selection).  The assignment was to create, create- for the sake of creating.

Text on a path is the most difficult part of Photoshop for me; I seem to have a mental block about it.  I am going to master it- but not today evidently. My attempts are not yet ready for prime time- so I did text on a very STRAIGHT path for my CREATE assignment.  I used a couple layers of Kim’s subtly yours and an additional layer of cora (to add some pink tones).

These blossoms are from the most beautiful cherry tree EVER (outside of Washington DC). I drive by this tree often and am totally in love with it.  You will see more photos on here another day for sure.


Beyond Beyond 9

Fonts! Typing on a path! Typing on or in a shape! Glyphs! Wow- lots of good stuff in this lesson!

I’m a little out of my photography comfort zone- and going back in time about 10 years to my attempts at digital scrapbooking.  After having worked with Photoshop for the last couple years, these skills are easier for me now than back then- but typing on a path is still my nemesis!

5X7 Card

19Mar2013-9646-Edit-Edit-2

The author of the last quote was Henry Ward Beecher (I couldn’t figure out how to incorporate it so that it looked okay).  Both photos are textured with Kim Klassen’s Sybil texture (yup- still my favorite).

Beyond Beyond 8

My father was an avid photographer.  I have boxes and boxes of slides and reel upon reel of movies stored in the closet.  When he retired from dentistry, he took photography classes at Butte College, and it is from this period that I have the photographs that I most treasure.  They are black and whites of my children when they were about the age my grandchildren are now.  He took the photos, developed the film, and matted the prints himself.

Most of his photos are landscapes however. He was a big fan of Ansel Adams, of course- I wish I had paid more attention when he talked about him! I recently re-discovered his old Nikon and a couple lenses in a closet.  I don’t think I will be getting into film photography, but it would be nice to get his camera cleaned and operational again.

ansel adams layout

I created this layout for my Beyond Beyond class. I combined two of the three assignments into one.  I actually did all three- but wasn’t happy with my results, so this is a quick re-do. The challenges were 1) to find an inspirational quote and, using a specified technique, make it look like it was printed on a chalkboard , 2) use matte processing, and 3) create a layout. The chalkboard technique was interesting, but complicated- and when I decided to create a layout using my quote, I decided I needed a different quote.  Instead of going through the process again, I used a chalk font I already had for this layout.  I have experimented with matte processing before and enjoyed using Kim’s technique.  And (confession time), I created this layout in Lightroom (easier for me than Photoshop).

Beyond Beyond 7

Our challenge this week was to start with a photo taken by Kim- and edit it our own way. I pretty much dreaded this one- not fun for me, because it brings up some nagging little fears of being compared to others.  I accidentally saw a couple edits on Flickr today while I was looking at my phone- oh no- they were really good!  I knew then that I had to start when I got home and not allow myself to look at any more.  Later, I will go back and learn from what others have done.

Here is Kim’s original photo- unedited except for white balance.

kk_acechairs

I went several different ways with my edit- a vibrant punchy way, a soft dreamy way, and, finally, a black and white with purple added to the shadows, which is my favorite.

kk_acechairs-Edit-3-2

I cropped and straightened, adjusted exposure and contrast, added a bit of clarity and grain- and then converted to black and white, adding a slight purple hue to the shadows.  In Photoshop, I did not add a texture, but used one of Kim’s new brush overlays (really like them!) on two layers, multiply and soft light blend modes.

So there you have it!

Beyond Beyond 6

The challenge for this lesson was “From Above”- taking a photo looking down at the subject.  Because of my San Diego trip, I didn’t have a chance to go through the lesson until yesterday, so am trying to catch up and get it done before today’s lesson is posted. So yesterday afternoon I stood on my cedar chest to take this shot of blossoms in a glass jar, placed on my mother’s marble top table.

5Mar2013-9414-Edit

Textured with Kim Klassen’s Anna texture.

Beyond Beyond 5

This week’s Beyond Beyond (2B) challenge was to find the best light in your house- and to practice some Photoshop tricks to add more light to photos. I am pretty familiar with the light (and lack of light) in my house at different times of the day after having done a Project 365 for two years, so concentrated on the Photoshop techniques.  I used the Sybil texture, as well as a white gradient to enhance the window light that was already present in this macro of a sea urchin from my shell collection.

23Feb2013-7961-Edit-2

And here’s a black and white version of the same photo (almost the same processing).

23Feb2013-7961-Edit

Beyond Beyond 4

The task this week was to bring something outside- from inside.  I was already planning to do something with Hershey’s Hugs (kisses were sold out. . .)- so I dragged them outside and created this layout.  Happy Valentines Day!

valentine layout

I did learn something new from this week’s lesson (talk amongst yourselves if you don’t use Photoshop. . .)- the best way for ME to add a texture to a photo is using MiniBridge.  Since I started using Aperture (and later Lightroom) before I started using Photoshop, I never found a need to open photos using Bridge or MiniBridge.  Now I see that, when I add a texture to a photo, it is much easier to keep MiniBridge open and drag a texture onto the photo, rather than clicking Open and using the finder window.  So- as my grandson, Henry would say- Happy, Happy, Happy !

Beyond Beyond 3


For this week’s Beyond Beyond assignment, we were challenged to take a series of photos with a shallow depth of field, focusing on different parts of the scene.  We were then to choose our favorites to post.  I chose my gerbera daisies, which are fading fast, for this assignment. Invariably, my favorites had the pink flower in front in focus, although I took quite a few focusing on the rear flowers or teapot.  So here are the three I like best.

teapot and flowers layout

I took these three shots using the light from my bedroom window.  If you look closely at the bottom photo, you can see a reflection of me sitting on the bed!

Beyond Beyond 2

My second assignment for Beyond Beyond (aka 2B), was to practice using various apertures and look at the resulting depth of field- and then to have fun using editing techniques in Lightroom and Photoshop.  The suggestion was to use Kim’s image of a white bowl of pinecones on a white chair, giving it a different look in processing.  Well- I have pinecones and a white bowl and a white chair- so I took my own photos.

31Jan2013-6939-Edit

I used one layer of Kim’s texture, simplistic, at 65% opacity and desaturated the image slightly to get rid of my yellow walls.  I googled simply to find an appropriate quote and found this one attributed to Mother Teresa.  After editing, I discovered Kim had used the same quote (except for one word) attributed to some one else.  Oh well- you can’t trust the internet!